If you are a WordPress user, then you definitely know what a WordPress Plugin is.
Basically, a WordPress Plugin is used to extend the capabilities of a WordPress Blog and helps to take it to a certain new level with custom modifications and functions which helps to do many things that you can’t do normally with basic installed Core WordPress.org software.
That was the glossary sections, although after installing WordPress for the first time, every newbie blogger needs to learn is how to install plugins in WordPress.
Plugins allows you to extend certain features like Custom Gallery, Slideshow etc.
There are tons of free and paid plugins available in the WordPress Marketplace for installation for everyone globally.
When you first install the WordPress, you get some plugins installed by default like Akismet, etc. They are very useful and lightweight plugins essential for any blog.
Being a beginner, don’t get overexcited with the fact that you got the freedom to install plugins easily as you should do some research before installing any plugins like Malware issues or if the Plugin is very heavy, or if it is whether very essential for you or not, etc.
Before getting started with installing plugins in WordPress:
You need to ensure that you are on the self-hosted WordPress.org site as installation of Plugins feature is not available in WordPress.com blogs.
So you need to first make yourself available with the Self-hosted WP site.
Alright! So now the below explained methods are the two of many other methods for installing the plugins in WordPress blog. We will be covering two different methods for installing the plugins i.e.:
- Install the Plugin using WordPress Dashboard Plugin Search Option
- Install the Plugin using the WordPress Dashboard Plugin Upload Method
1. Install the Plugin using WordPress Dashboard Plugin Search Option
This method is basically based on the WordPress Admin dashboard and the WP Plugins marketplace only, so this is the safest and easiest way to install WordPress Plugin.
Basically, if you are thinking to install a free plugin from the WordPress Plugins Market, then no need to go to the WP Plugins directory site manually to install, this can be done more easily through the Admin Panel of the site only.
The only downside of this option is that a plugin must be available in the WordPress plugin directory which is limited to free plugins only which means the 3rd Party Premium/Free plugins cannot be installed this way.
As Always for WP, First thing first! Go to the Site Admin Panel and login with your credentials.
Now in the Site Dashboard, Click on Plugins > Add New.
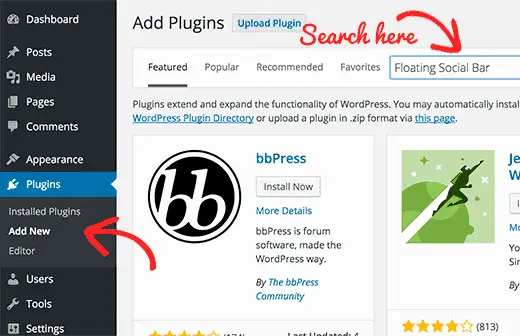
You will now get a page similar like one shown in the screenshot below. Here you will get tons of Plugins recommendations which are very high rated and good, you may try them if of are any use otherwise stick to what you looking for. In the search bar, type the name of the plugin like for tutorial purpose, searching for Floating Social Bar plugin.
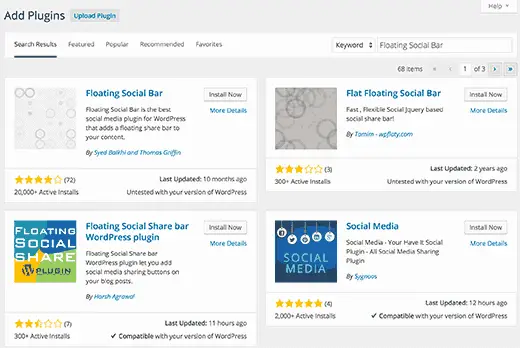
- From the results, choose the one which you think is best for you. (You can decide the best by reading the reviews, popularity, ratings etc.) After that all you got to click is Install Now button.
WordPress will now download and install the plugin for you. After this, you will see the success message with a link to activate the plugin or return to plugin installer. As any plugin can be installed on the WordPress Site but won’t work until it is triggered to be activated.
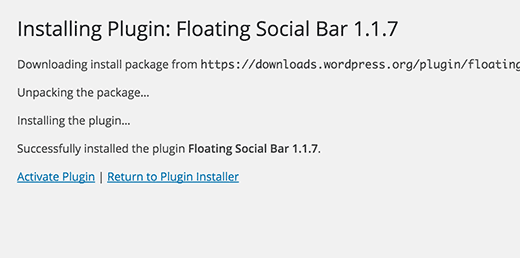
So once you activate the Plugin, simply configure it as per your needs. Moving On!
2. Install the Plugin using the WordPress Dashboard Plugin Upload Method
The first method might be very easy one but is not for the ones who are looking to install Premium or any Free 3rd party plugin like Monarch or OptinMonster which is not actually available in the WordPress marketplace.
Still no Worries!
That’s why WordPress has the feature of the Upload method to install such plugins. That can also be done very easily with this method:
First download the Plugin files compressed in a .zip package from the Market where you buying or from the commercial Plugin provider.
Now Login to your WordPress Admin Panel then go to Plugins > Add New.
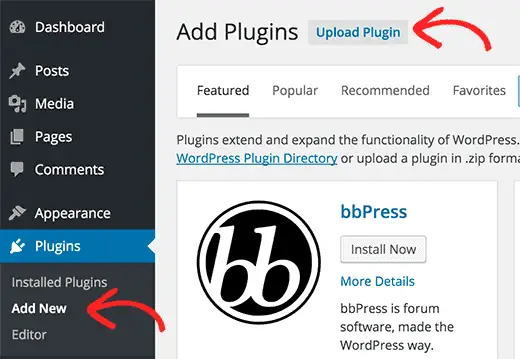
Now after the page opens, click on Upload Plugin button on the top.
This will open you a new page for you to upload your plugin.
Click on the choose file button and select the plugin file you downloaded earlier to your computer from the 3rd party provider.
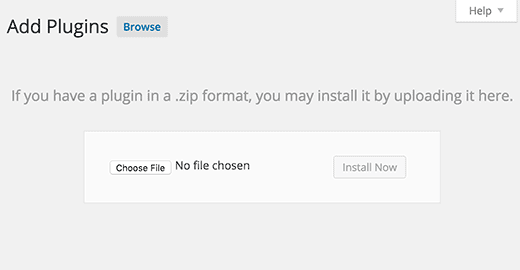
Once you select the file, click on the Install Now button.
WordPress will now upload the plugin file (.zip) from your computer to the Host and install it for you and you will see a success message like below after installation is finished.
Once the plugin is installed, click on the Activate Plugin button in order to make it functioning onsite.
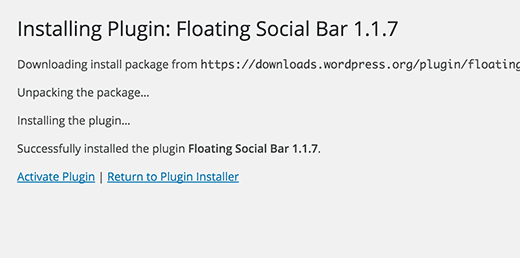
That’s all wasn’t that too easy? Although as mentioned earlier it’s for only the Self-hosted WordPress.org users. One more expert opinion is that – Do not install too many plugins just to extend the functionality of the site, the result may also be drastic if your host doesn’t support tons of plugins and Site may slow down or crash. Some of the most recommended plugins are:
- Jetpack from Automattic: It’s a free and also very useful plugin. Though its quite heavy than the core wordpress too.
- Google Analytics: To keep an eye on the Site’s Traffic and Stats.
- Monarch: It’s a premium plugin though very useful for Social sharing purposes.
- W3 Total Cache: Caching is very important to make site load faster. W3 Total cache is leading in this.
- WordPress Yoast SEO: One ultimate solution of WordPress SEO.
And many other plugins are there which you can try as per your requirements.
Let us know in the comments below about any Plugin you love the most?

